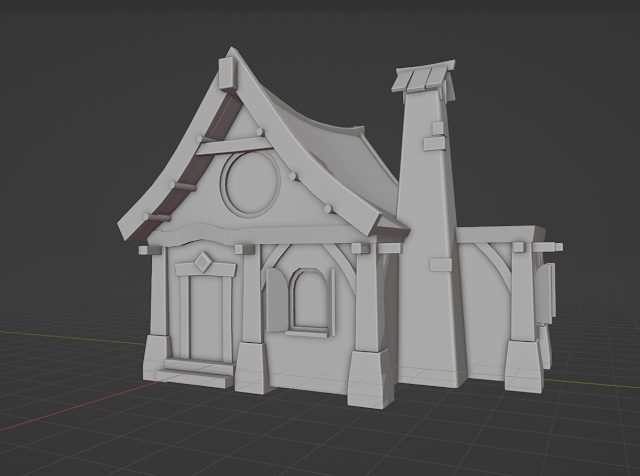
#6 - Building Blockout Progress
After a fairly unproductive week for this project, I finally got around to working on the building blockout.
My strategy was to overlay the concept as best I could in Blender, and figure out the scale based on the Unreal Engine Mannequin character.
Unfortunately, lining the concept up perfectly with the viewport wasn't really possible, with the perspective of the image proving impossible to match exactly. This meant I had to take some liberties and do some guesswork here and there with the overall proportions and shape of the building. However, it did help to get the basic shapes down, and it was very valuable to have the reference easily in view while I worked.
Using my breakdown from Post 4, I created the unique shapes, and modular pieces I would need.
Step 1 - Basic Landmarks
To begin, I started with the door and it's frame. Using a scale reference of the default UE5 character, I was able to get an idea of the proportions. With this scale reference, it was easier to work out the size of the elements surrounding it.
I then worked out a width for the wall pieces that would fit on a grid, this was to ensure I could snap pieces together in-engine. I also created a single corner column, which, going forward, I can sculpt once and just duplicate multiple times.
Step 2 - Larger Details
This step mostly included the larger details that protrude from the structure. Again, I intend to sculpt one of each element, and reuse it multiple times.
Step 3 - Smaller Details
Step 4 - Test in-engine.
I still have the side roof to create, and a few other smaller details are missing, such as the Y-Beam at the front.
Eventually, I will be reconstructing the building in-engine using a much more modular approach, but for now the building is all one mesh.
I have also adjusted the position of the bridge in the composition, which I think leads the eye towards the front of the house better, as well as showing off more of the river up-stream.


Comments
Post a Comment